Tuesday, July 31, 2012

Who's Reading?

I remember last year, my son's wonderful teacher (I taught her to blog), mentioned that she wasn't getting a lot of hits on her blog.  I told her that it probably was because people had signed up to get her blog via email. It only took a few clicks, but in moments I was able to show her a list of all the people who had signed up to get her blog.  
Sometimes it can be frustrating to put in the work for a blog when you think that no one is reading, but chances are they are reading!  Because the topic came up again recently, I wanted to show you how to check who is getting your blog via email.

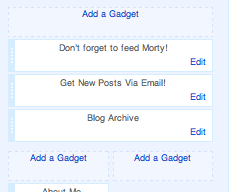
The first thing you need to do is go into your blog layout (pictured below).


Look for the gadget that you added for others to sign up to follow your blog.  Mine says, "Sign up to get this blog as..." Click 'Edit' on that box.


When you click "Edit" a box similar to the one pictured above will show up.  Click on "View stats and learn more."
The next screen you will see will be your blog (or blogs) title(s).  Click on the blog you want to check on (I blocked out my site because I was using my school blog info to show you).  You can see from here how many have signed up to get your blog.  In this case, 36 people are getting my school blog emailed to them.
Next you will see the box shown above.  Click on "See more about your subscribers."

Click on Feedburner Email Subscriptions and then "Manage your Email Subscribe List."


Next you will see the addresses of your 'followers'.  Please note that they will only be getting emails if they are 'Active'.  If they are "Unverified" it means that they signed up to get your blog as an email but didn't click on the link they should have received via email to allow feedburner to send them emails.  This may be because the email went to a spam folder so you may want to contact that person and have them sign up again or remind them that they need to verify their email address.

If parents haven't signed up, you may want to keep your computer handy at conferences and sign them up there to ensure that they are getting all the wonderful info you want to share with them.

Hope this helps!  If you have any other topics you want me to cover, just let me know!
Chances are that you are not alone.  Someone asked this question and I found four people in my room wanting to learn more about how to see their followers.
Good luck!

Monday, July 30, 2012

How to Add PDFs!!!!

It was a very exciting day when I actually figured out how to add PDFs to my school blog. I have no idea why it took me so long to figure it out, but once I did it, it was super easy.  My coworker Angie was a great help too (thanks Angie).
The first thing I would suggest doing is to convert any file would like to share to a PDF.  You could keep things in word, but some computers (like my beloved mac) don't have word and when I tried to upload something in Publisher, it also wouldn't work.  Plus the PDF looks much nicer than a working file anyway.  That of course is just my humble all-knowing opinion.

After you have your file ready this is all you'll need to do:

Click on "Drive".  You will see this whenever you are signed in to Google.  I can see it at the top of this post I'm typing since Blogger goes through Google.
Note to WL teachers and perhaps teachers in other districts: You can NOT share files to non-WL people so if you want this for your parents or other teachers you will need to use (or create) a new google account.  If you started this blog recently, chances are you are using a gmail account so you should be just fine. 

Once you click on drive you will see the picture (above) on the left side of your screen.  Click the upload button.  It will then let you choose what file you would like to upload.  For the purpose of this blog, I uploaded PDFs of something I put on my other blog.  When you upload a file, you can click on the name of that file and you will see that your file now has a http: (Internet) address. You will use that address to link your PDF to your blog. 
***See my other post about "Links" by clicking HERE if you forgot how to do them.***


There is one more step that you MUST do if you'd like others to be able to view your file.  You will need to make it PUBLIC.  Google docs automatically will make your files private (the lock is shut). To change this click on the blue share button (shown above).

You will need to change who has access to your file by clicking Change (above).

Then click on "Public on the web".
SAVE!
NOW your file is public and can be viewed by anyone so you can link it to your blogs!
Good luck!

Sunday, July 29, 2012

Adding Pages

When I had a website for my classroom, I had a page for each content area, which turned out to be too much.  When I started out my classroom blog, I wrote about all of my content in a weekly review which worked for me, but I still wanted another page for things like my weekly schedule, important things (like snack information) for my parents to be able to reference, etc.  One way to do this is by creating pages.

You can create different standing pages for your blog and add to them when you want.  You can also keep them (and turn them off for the summer) if necessary.  For example, I have a Conference Time page for parents but I turn it off after conferences because it is no longer necessary.  You can set up pages in two places at the top of your blog, like this:
Or you can set them up so they go down the side of your page (like where you would add your gadgets... etc), like this:

It's up to you where you put your pages, and is an easy thing (again) to change should you decide you want a different look later.

The first thing you will need to do is go to your dashboard and click on the clipboard (refer to earlier posts if  you don't remember where this is). When you look at your choices, you should see the word "Pages" and click on it.

I am going to show you how to add one page, but if you add more you will do the same thing that I am showing you.  Click on New Page and then "Blank Page".  

Once you do that, you will be taken to a new page that looks exactly like the page you use when you are writing a blog.  The only difference is instead of having a title post, you will have a box at the top that says, "Page Title".


 You will just type the information you want to include on your standing page. On the right side you will see some orange lettering that says, "Page Settings".  I don't do anything with this, but if you'd like you can turn off the comments on this page.  Since I am adding a page about favorite widgets, I am leaving it open to comment.  If you find some great widgets you love, please feel free to comment on that page so others can share.  

One thing I have learned about teaching is that everything is shared and borrowed and tweaked to make it your own.


As I mentioned before, you can choose where your pages are set up.  To do that, go back to pages (after you have "published" your new page just as you would a blog post).  On that page it will say, "Show Pages as" click on the box next to it and you will see a drop down menu where you can choose top tabs or side links.  Again this is just a personal preference and something you can change at any time.

GOOD LUCK!

Friday, July 27, 2012

Important Log-in Infomation

As I had mentioned in an earlier post, I have created this blog because I had written a blog using the "old" Blogger that is now outdated.
To do this I created a new email and account. With my old blogs, I was able to log on to blogger using my email addresses at Yahoo and through school.  Though I set up a "Yahoo" address to create this blog, when logging in again it changed my email to a 'gmail' account.  I was unaware of this and was worried when Blogger would not let me sign in using my email.  Please be aware of this when signing in, if you are unable to log in, it could be because you are using yahoo (or another server) rather than google.
GOOD LUCK!

Adding Movies and Slide Shows

You can add movies from YouTube and Slide Shows (from Smilebox) to your blogs and it is easier than you think!  If you are unfamiliar with Smilebox, it is FREE and the website is pretty self explanatory.  You can find the website for Smilebox by clicking HERE.

The first thing you will need is the YouTube video or the Slide Show that you would like to post on your blog.  As an example I am including a cute video I took of my son's first bus ride.

First you need to find the movie that you would like to share.
Click on the share button and a box will show up below the movie.  Since you don't see the orange blogger icon, click "more" and then choose 'blogger.  A new window will show up that will look like a post of your movie.  If you want a post with JUST your movie, you are all set!  If you would like to put the movie somewhere in your post you will need to do the following.

When you clicked on the blogger window to share it looked like this:

To add it to your blog,  you will need to be working on the HTML code with both the movie and on your blog.  If you are wondering what the heck is she talking about, I am going to walk you through it now.

From the screen shown above you will need to go from the "Compose" button to the "Edit HTML" button. When you do that the picture of your movie will disappear and it will look like this:

You will need to copy this code (like you have others) by highlighting it and copying it (using "control c" or "command c" depending on your computer).

Once your code is copied, go back to the page where you are composing. You will need to change this page from the "Compose" mode (where everything looks normal), to the "HTML" mode where everything will be written in code.  Once you are there, paste in the code you copied from your You Tube Video or Smilebox.

I have pasted my code at the very bottom of all the nonsense code that makes no sense to me.  I simply scrolled down as far as I could, hit return and pasted my YouTube code (using control/command v). Then you simply go back to "Compose" and everything should look normal again and you should see a picture of your movie (or slide show).

And for your viewing pleasure, I am keeping the video I used for this post.  If you are a teacher, I think you will enjoy it (though I think anyone would enjoy it). A direct link to the video can be found by clicking HERE.


GOOD LUCK!

Time to Post

IT'S TIME TO WRITE!

Now that your blog is set up, it is time to post.  The first time you post, it may take a while but the more you post, the faster you will become.  When you get to your dashboard, you simply need to click on the orange box with the pencil (posted above).

After you click on it, you will see a box like the one posted below.

I will not spend a lot of time on this post because I feel like most of it is self explanatory. On the left of the orange "Publish" box, is where you will write title for your post.  I mentioned in an earlier post that on my school blog my title posts are simple, "Week 3 in Review".  You can put any title you would like or you can leave it blank and the date will be your title.

You will type in the large box.  Above the box you will see icons like you would see on most computers (bold, italics, underline, flush left/ center/ right etc...). You can change your text size but clicking on the T box.  Play around here to familiarize yourself with the icons.

ADDING PICTURES

To add pictures you will need to click on the icon of the picture (to the right of the LINK icon). To upload pictures you click where it says, "Choose Files".  Upload all the pictures you will want to use for your post (if you find you need another later, don't worry... you can upload more).  When you are ready to add a picture select the picture (which will highlight it in blue) and click "Add Selected".
When you add your picture it will look like above (I have taken pictures of my work on this blog to help you which is what you see above).  
If you click on your picture, it will turn blue and you will see choices below your picture.  You may choose to add a caption, change the size of your picture and choose where to position it on your page. On my blogs I often will choose a medium picture (which is the default size you see on this page), but I will move it to the left so that I can type to the right of my pictures.  This is all personal preference and there is no right or wrong way of doing it.

ADDING LINKS
Creating links is very easy in blogger, this is how you do it.  
While you are typing there may be a WORD that you want to use as a link. (I am going to use the word, "WORD".  Start by highlighting the WORD that will be your link.

Once it is highlighted (as seen above), click on the underlined word "Link" above next to your picture icon.  You will see this:
Then all you need to do is type the address you would like linked in the box provided.  I have created a link from the word "WORD" above to a website I like at www.wordle.net.  When you are done entering your link just click "OK".

Play with this page! You can change the color, add bullets, and of course SPELL CHECK! You may also add movies using the icon of the "Director's cut clipboard" above.  Be warned that the videos you post using this method can not be very long which his why I use another way which I will show you in my next post.

GOOD LUCK!

Adding Gadgets

This post is all about 'gadgets'.  You can add many gadgets to your blog.  You can add text, pictures, polls and countless other things. Here I will show you how to add gadgets (and widgets) to make your blog more interesting for your readers.


Again you will be working from your "layout" page that was mentioned in the previous post.

You will click on "Add a Gadget" and you will see a variety of gadgets you can add to your blog. You can use any of the gadget listed (or none) but I thought I would share some of the ways I have used gadgets on my classroom blog.

TEXT GADGETS

I use the text box to write upcoming events on my blog.  In the "Title" box, I write, "Upcoming Events" and in the content box I write the dates of different upcoming events from days off school, due dates, PTA meetings... etc.  I also use text boxes to encourage people to comment on my blogs (don't take it personally if people don't), and share other important information I would like them to see.

FOLLOW BY EMAIL

To ensure that my families get all my blogs (as I publish them), I have a "Follow by Email" gadget that I added.  The way this gadget works is that it allows people to sign up to get your blog emailed to them every time you publish a new post. To add this gadget to your site you just need to click "save". You may also come up with a catchy title if you would like.

I always sign up to get my blog posts via email.  I do this for two reasons.

1. It is allows me to be SURE that my families were also emailed my new posts (I know when they get it).

2. When I get a copy emailed to me, if I have any families without interenet connections, I print out the email of my blog and send it home so they have the same information as everyone else.

My last post of the year, I let parents know that they should click on the "unsubscribe button" (which is at the bottom of each email post that they have sent to them) so that they are no longer get emails of all my posts. I do let them know if they ever want to check back and remember what it was their child did in first grade, my old posts will always be there.

As you can see from the photo above you can see which people (or rather which email addresses) have signed up to get your blog via email by clicking on "view stats" and "learn more".

I have added this gadget to this blog should you want to be alerted when I add a new post.

ADD A POLL
In the past I have added polls to encourage my students to go to my blogs.  I have also used it to get feedback from my parent community.  The way this works is you write your question. For example you could write, 'How do you prefer to get notes from school?' and then you write the answers they can choose from in the "Answers" boxes.  For the example question I mentioned you could write "Blog, Newsletter, Classroom Note... etc. You then choose a date to close your poll and simply click save.

WIDGETS!

Widgets are fun things that you can put on your blog (similar to gadgets) but you may find them somewhere else (other than blogger).  For example, on my blog I have widget with a globe showing where my 'readers' are from.  I have a widget to help parents level books for their children. I have a widget of a little animal on my blog that my students can go and feed...
If you see something cute on a blog or a website, try clicking on it.  Chances are it is a widget and by clicking on it you will be taken to where the widget originated and it will show you how to get your own (by supplying a code).
All widgets are written in code so you will add them the same way you added your new background using the HTML/ JAVA gadget shown below.

When you add the code from a widget, you will always add it in the content box.  You do not need to add a title to your widgets, though you can if you would like to.  For example, on this page I have added a widget of a turtle.  You can add a widget like this by clicking on "Adopt your own pet".  It will take you to a page where you can choose an animal to add to your site. When given an option, remember that your site is blogger or blogspot. You can also look for the "Blogger" icon which is the white B in the orange box.

Finally, you can change the order of your gadgets by simply clicking (and holding) on them from your layout menu and dragging them to where you want them to be.  I have added my "Follow by email" and my widget of Morty.  I would like my "Follow by Email" gadget to be the first my readers see, so I simply need to click on my "Follow by Email" gadget and drag it above my gadget with Morty and click save.


Good Luck!

Backgrounds (The Cutest Blog on the Block)

Your blog is now ready to start posting, but there are fun extras that you can add to your blog to make it more fun and inviting for your readers. This post will address backgrounds.  All of the work you will do to change your background (and add fun gadgets) is located in the template page.

Go to your dashboard and click on the clipboard (mentioned in earlier posts).  From there you will want to click on "Layout" (shown in picture below).

When you click on the layout page it will look like this:
Layout is where I will show you how to change your background and add gadgets. You will want to keep this page open.

 
BACKGROUNDS
I am in love with the website The Cutest Blog on the Block and get all of my cute (FREE) backgrounds from their site. While working on this part of your blog, you will want to make sure you have three windows open to toggle between.  Keep this page open (for reference), The Cutest Blog on the Block website (which you can reach by clicking HERE) and your blog's layout page.


When you get to the cutest blog on the blog website, you will see the word "Backgrounds." When you move your mouse to it you will see some choices drop down.  Click on "Blogspot".


From there you will choose "Select a Category".
You will see a variety of topics (themes) that you can choose from. You can (literally) spend hours looking at backgrounds.  Like everything else, this can always be changed (I change my backgrounds monthly). The backgrounds that fit onto your blog are the "3 Column" designs.

When you find a background you like, click on it. It will show the background you chose and the following directions:


You will see a code (where I put the red arrow above).  You will need to copy this entire code.  To do this, highlight the entire thing and hit "control c" (or "command c" if you are working on a mac).


Then go back to the window where you have your layout page and click "Add a Gadget".

When you click on "Add a Gadget" you will see many different "Gadgets" you can choose from.  To add a background you will need to scroll down until you see add an HTML code.


Click on the white + sign in the blue box (above) and you will see this (below):


Go to the content box and paste the code you copied by pressing "control v" (or "command v" if on a mac).  Leave the "title" box blank. CLICK SAVE (in orange). Please note your box will be empty.  The picture above was taken after I pasted my background code.

After you click "save" it will bring you back to your layout window.  Click on "View Blog" at the top and you should be able to see your blog with it's new background.

WHEN CHANGING A BACKGROUND:

When changing a background you will NOT need to "add" a gadget because your background gadget will already be there.  Simply go back to your layout page which will now look like this:

Simply click on edit (where I placed the red arrow).  The same box HTML box will pop up with the code that you added from your last background.  ERASE YOUR OLD CODE and then paste in your new code.  Remember to leave the title blank.

Some of my "bloggie" students have had problems changing backgrounds because they forget to erase their old codes. If you ever have problem, please feel free to contact me or come back to this site.

GOOD LUCK!

Getting Started and Settings

In my opinion, the hardest part about blogging is setting up a blog.  Once you have it set up, actually blogging, changing backgrounds, etc is easy (trust me on this)!

Let's get started.

To create a blog you will need to go to www.blogger.com

In the upper right hand corner (in red), click on "Sign Up". I won't go through all of the details but you will need to choose an email to blog from (I recommend using your school email for school blogs, home email for personal blogs), create passwords etc.  I won't go through every step with you as it is pretty self explanitory BUT I will tell you to write down your passwords!  I started a blog at www.blogitteacher.blogspot.com but because I forgot my password (and the new email I created to start a new blog), I am unable to edit it.

You will start a new blog and one of the things it will ask you to do is to choose a layout.  There are many layouts you can choose from and none are set in stone.  If you would like to be able to change the background easily (I use different season themes, etc), choose a layout from the "Picture Window" choices.  I will show you how to change backgrounds in a later post.


The picture above is a shot of your 'dashboard'.  You will see these icons often.  If you would like to create a blog post, you will click right on the orange pencil. The clipboard has an arrow next to it with a drop-down menu to help you get other information quickly and easily and the "View Blog" button is a quick way for you to see what your blog looks like at any time.

Before you begin blogging, review your settings.  To do this, click on the drop-down menu next to the clip board and scroll down to settings.  At this time (blogger can sometimes change), settings is the last choice in the drop-down menu.

This is the screen you will see.  The first thing I would suggest you do, is go to where it says "Privacy" and click on Edit.  

When you click on Edit (above), check that you do not want your blog added to bloggers listing and that you do not want search engines to find your blog. **Don't forget to click "save changes".

Also under the word "Setttings" take a look at the other areas where you have control over settings.

This is what I (change) in my settings:

Under Posts and Comments:

1. Change "Who can comment" to Anyone. I do this so that parents who do not have a google account can still comment.

2. Change "Show word verification" to No.  I do this because I think this deters people from commenting.  I don't comment on blogs with word verification because it is sometimes hard for me to read the letters and numbers in the strange font.  If you get spam on your comments (which you shouldn't since you turned off your search engines) you can go back and change this setting (and any other setting) at any time.

***Save Settings***

Under Mobile and Email:

1. Comment Notification Email
In this box will be the email you set up your blog with.  If you are doing this from an email you do not check often, add the email you use the most.  This box will send you an email of any comment that is left on your blog.  For example, I add my person email to this box so that if someone writes a comment on my school email (which I don't check daily in the summer), I will still see it immediately (since I do check my personal email).

There are other settings that you can decide (There are different ways to display the date/ time etc).  I have left all other settings as is, but this is your preference.  You can come back to this page and change these settings at any time too.

How it all began

As a teacher, I have used many forms of communicating with the families of my students over the years.  I went from notes, to newsletter to a website.  Nothing seemed to fit me or adequately communicate everything that goes on in my classroom. 
Years ago, I began blogging to document the daily adventures of my family and it occurred to me that I could create a blog for the families of my students to follow the (weekly) adventures of my students.

I got very excited about the thought of creating a blog for my classroom because blogging was fun, easy and FAST for me.  I also liked how easy it would be to share classroom pictures and videos. 

I have had a classroom blog since 2010 and it has been a huge success with both students and their families.  I say "families" because with a blog, the learning my students do in my classroom can be shared not only with their parents, but their grandparents and others living across the country (and even out of the country).

Having used a blog as the main form of communication for parents the last years, I would like to share a few tips that you should consider when starting your own blog.

1. Create a Permission Slip
Make sure to get a signed permission slip for each of your students so that you may take pictures and/or videos.  If a parent does not want their child photographed for the blog, ask them to talk with their child about it as you will need to ask that child to step out of group shots.  So far, all of my parents have allowed me to photograph their children so this has not been a problem for me.

2. Never Use Last Names
When writing about your students NEVER use last names.  The same goes for parents.  When I have parent volunteers or a visiting grandparent read a story to my class, I always refer to them as "Joey's Mom" or "Ali's Papa". Again, this will help parents (myself included because I have taught my children's teachers how to blog) feel more comfortable having pictures of their children on the web. Another thing to remember is to blur last names in photos of student work. Most computers now make it easy to do this.

3. Keep in Quiet
As much as you can, try not to refer to your location or school by name.  This too will help parents who may be leery about your using a blog with their child's picture on it. You can also set up settings so that your others can not to a 'search' for your blog through google or other search engines. Again since other's can't 'stumble' upon your blog in a search engine, you should be OK.

4. Picture Tips
If you are using pictures in your classroom blog (which I highly recommend because it is a HUGE draw for parents to come 'see' how cute their children are), be sure to take one group picture for every post. I say this because (again speaking as a parent), before I read anything on a blog, I first scan to see if there are any pictures of MY kids. If you do at least one group shot you will cover everyone.  I also take A LOT of pictures and any pictures I don't use (I try to post under 10), I post at the end of my blog in a "Smilebox" slide show (I will show you how to do that on your blog).

5. Start Out Slow!
Like anything, there is a learning curve to blogging.  The more you do it, the better you will become. Think about what YOU want to use your blog for and make a goal as to how often you will update it. I update my blog once a week (publishing it on the weekend) and all my blog titles are quite generic, "Week __ in Review". I do have the occasional midweek blog for information I want my parents to have quickly.

6. Make Media Your Friend
Computers can be scary, but we know as educators that the world is changing and as it changes, so should our classrooms. Parents are on computers, they're on facebook... make these things work FOR you as our ultimate goal is for families to partner up with us so that together we can help make learning all it can be for their child.

If you would like to see my classroom blogs (I have one for my classroom, one for my students' writing pieces, and one for "Summer Suggestions") or you have questions or would like me to write a post about something you would like to know more about, please feel free to leave a comment here or email me at: momentsofpause@yahoo.com  

Happy Blogging,

Laura