Saturday, August 29, 2015

Are you on Twitter?

If you are on twitter and want to add a twitter feed to your blog, you can do so easily with these steps!

First, you will need to go to your twitter settings which you should be able to get to easily by clicking HERE.

That link should (fingers crossed) take you to a page that already has YOUR twitter feed shown and looks like this (make sure you're logged in to twitter of course).  The defaults I liked were all already checked.  You can play with color and things here also.  When you're ready (I didn't change ANYTHING),  click on "create widget.


You wil then see a box with a bunch of code in it that looks like this (above).  Highlight and copy all of the code.  


Go into your layout and click "Add a Gadget"


The Gadget you will add will be the HTML/ JavaScript.  Just hit the + button.


Paste your code here!

Thats' it!  Told you it was easy!! ;-)  Let me know if you need anything else and follow me on twitter!
:-)
Laura @LLEMrsDoran


Tuesday, July 31, 2012

Who's Reading?

I remember last year, my son's wonderful teacher (I taught her to blog), mentioned that she wasn't getting a lot of hits on her blog.  I told her that it probably was because people had signed up to get her blog via email. It only took a few clicks, but in moments I was able to show her a list of all the people who had signed up to get her blog.  
Sometimes it can be frustrating to put in the work for a blog when you think that no one is reading, but chances are they are reading!  Because the topic came up again recently, I wanted to show you how to check who is getting your blog via email.

The first thing you need to do is go into your blog layout (pictured below).


Look for the gadget that you added for others to sign up to follow your blog.  Mine says, "Sign up to get this blog as..." Click 'Edit' on that box.


When you click "Edit" a box similar to the one pictured above will show up.  Click on "View stats and learn more."
The next screen you will see will be your blog (or blogs) title(s).  Click on the blog you want to check on (I blocked out my site because I was using my school blog info to show you).  You can see from here how many have signed up to get your blog.  In this case, 36 people are getting my school blog emailed to them.
Next you will see the box shown above.  Click on "See more about your subscribers."

Click on Feedburner Email Subscriptions and then "Manage your Email Subscribe List."


Next you will see the addresses of your 'followers'.  Please note that they will only be getting emails if they are 'Active'.  If they are "Unverified" it means that they signed up to get your blog as an email but didn't click on the link they should have received via email to allow feedburner to send them emails.  This may be because the email went to a spam folder so you may want to contact that person and have them sign up again or remind them that they need to verify their email address.

If parents haven't signed up, you may want to keep your computer handy at conferences and sign them up there to ensure that they are getting all the wonderful info you want to share with them.

Hope this helps!  If you have any other topics you want me to cover, just let me know!
Chances are that you are not alone.  Someone asked this question and I found four people in my room wanting to learn more about how to see their followers.
Good luck!

Monday, July 30, 2012

How to Add PDFs!!!!

It was a very exciting day when I actually figured out how to add PDFs to my school blog. I have no idea why it took me so long to figure it out, but once I did it, it was super easy.  My coworker Angie was a great help too (thanks Angie).
The first thing I would suggest doing is to convert any file would like to share to a PDF.  You could keep things in word, but some computers (like my beloved mac) don't have word and when I tried to upload something in Publisher, it also wouldn't work.  Plus the PDF looks much nicer than a working file anyway.  That of course is just my humble all-knowing opinion.

After you have your file ready this is all you'll need to do:

Click on "Drive".  You will see this whenever you are signed in to Google.  I can see it at the top of this post I'm typing since Blogger goes through Google.
Note to WL teachers and perhaps teachers in other districts: You can NOT share files to non-WL people so if you want this for your parents or other teachers you will need to use (or create) a new google account.  If you started this blog recently, chances are you are using a gmail account so you should be just fine. 

Once you click on drive you will see the picture (above) on the left side of your screen.  Click the upload button.  It will then let you choose what file you would like to upload.  For the purpose of this blog, I uploaded PDFs of something I put on my other blog.  When you upload a file, you can click on the name of that file and you will see that your file now has a http: (Internet) address. You will use that address to link your PDF to your blog. 
***See my other post about "Links" by clicking HERE if you forgot how to do them.***


There is one more step that you MUST do if you'd like others to be able to view your file.  You will need to make it PUBLIC.  Google docs automatically will make your files private (the lock is shut). To change this click on the blue share button (shown above).

You will need to change who has access to your file by clicking Change (above).

Then click on "Public on the web".
SAVE!
NOW your file is public and can be viewed by anyone so you can link it to your blogs!
Good luck!

Sunday, July 29, 2012

Adding Pages

When I had a website for my classroom, I had a page for each content area, which turned out to be too much.  When I started out my classroom blog, I wrote about all of my content in a weekly review which worked for me, but I still wanted another page for things like my weekly schedule, important things (like snack information) for my parents to be able to reference, etc.  One way to do this is by creating pages.

You can create different standing pages for your blog and add to them when you want.  You can also keep them (and turn them off for the summer) if necessary.  For example, I have a Conference Time page for parents but I turn it off after conferences because it is no longer necessary.  You can set up pages in two places at the top of your blog, like this:
Or you can set them up so they go down the side of your page (like where you would add your gadgets... etc), like this:

It's up to you where you put your pages, and is an easy thing (again) to change should you decide you want a different look later.

The first thing you will need to do is go to your dashboard and click on the clipboard (refer to earlier posts if  you don't remember where this is). When you look at your choices, you should see the word "Pages" and click on it.

I am going to show you how to add one page, but if you add more you will do the same thing that I am showing you.  Click on New Page and then "Blank Page".  

Once you do that, you will be taken to a new page that looks exactly like the page you use when you are writing a blog.  The only difference is instead of having a title post, you will have a box at the top that says, "Page Title".


 You will just type the information you want to include on your standing page. On the right side you will see some orange lettering that says, "Page Settings".  I don't do anything with this, but if you'd like you can turn off the comments on this page.  Since I am adding a page about favorite widgets, I am leaving it open to comment.  If you find some great widgets you love, please feel free to comment on that page so others can share.  

One thing I have learned about teaching is that everything is shared and borrowed and tweaked to make it your own.


As I mentioned before, you can choose where your pages are set up.  To do that, go back to pages (after you have "published" your new page just as you would a blog post).  On that page it will say, "Show Pages as" click on the box next to it and you will see a drop down menu where you can choose top tabs or side links.  Again this is just a personal preference and something you can change at any time.

GOOD LUCK!

Friday, July 27, 2012

Important Log-in Infomation

As I had mentioned in an earlier post, I have created this blog because I had written a blog using the "old" Blogger that is now outdated.
To do this I created a new email and account. With my old blogs, I was able to log on to blogger using my email addresses at Yahoo and through school.  Though I set up a "Yahoo" address to create this blog, when logging in again it changed my email to a 'gmail' account.  I was unaware of this and was worried when Blogger would not let me sign in using my email.  Please be aware of this when signing in, if you are unable to log in, it could be because you are using yahoo (or another server) rather than google.
GOOD LUCK!

Adding Movies and Slide Shows

You can add movies from YouTube and Slide Shows (from Smilebox) to your blogs and it is easier than you think!  If you are unfamiliar with Smilebox, it is FREE and the website is pretty self explanatory.  You can find the website for Smilebox by clicking HERE.

The first thing you will need is the YouTube video or the Slide Show that you would like to post on your blog.  As an example I am including a cute video I took of my son's first bus ride.

First you need to find the movie that you would like to share.
Click on the share button and a box will show up below the movie.  Since you don't see the orange blogger icon, click "more" and then choose 'blogger.  A new window will show up that will look like a post of your movie.  If you want a post with JUST your movie, you are all set!  If you would like to put the movie somewhere in your post you will need to do the following.

When you clicked on the blogger window to share it looked like this:

To add it to your blog,  you will need to be working on the HTML code with both the movie and on your blog.  If you are wondering what the heck is she talking about, I am going to walk you through it now.

From the screen shown above you will need to go from the "Compose" button to the "Edit HTML" button. When you do that the picture of your movie will disappear and it will look like this:

You will need to copy this code (like you have others) by highlighting it and copying it (using "control c" or "command c" depending on your computer).

Once your code is copied, go back to the page where you are composing. You will need to change this page from the "Compose" mode (where everything looks normal), to the "HTML" mode where everything will be written in code.  Once you are there, paste in the code you copied from your You Tube Video or Smilebox.

I have pasted my code at the very bottom of all the nonsense code that makes no sense to me.  I simply scrolled down as far as I could, hit return and pasted my YouTube code (using control/command v). Then you simply go back to "Compose" and everything should look normal again and you should see a picture of your movie (or slide show).

And for your viewing pleasure, I am keeping the video I used for this post.  If you are a teacher, I think you will enjoy it (though I think anyone would enjoy it). A direct link to the video can be found by clicking HERE.


GOOD LUCK!

Time to Post

IT'S TIME TO WRITE!

Now that your blog is set up, it is time to post.  The first time you post, it may take a while but the more you post, the faster you will become.  When you get to your dashboard, you simply need to click on the orange box with the pencil (posted above).

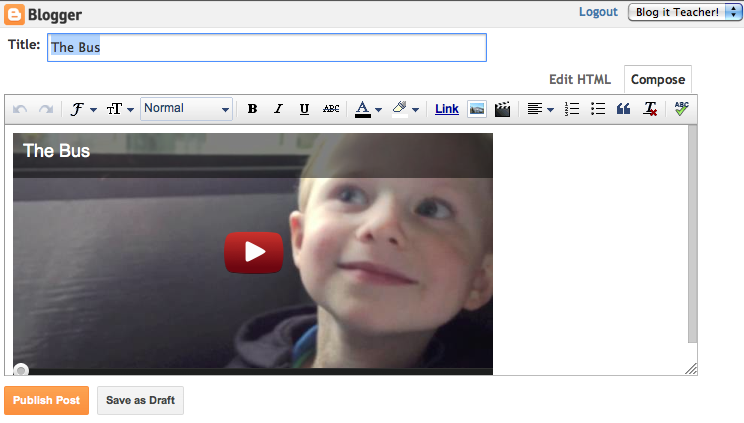
After you click on it, you will see a box like the one posted below.

I will not spend a lot of time on this post because I feel like most of it is self explanatory. On the left of the orange "Publish" box, is where you will write title for your post.  I mentioned in an earlier post that on my school blog my title posts are simple, "Week 3 in Review".  You can put any title you would like or you can leave it blank and the date will be your title.

You will type in the large box.  Above the box you will see icons like you would see on most computers (bold, italics, underline, flush left/ center/ right etc...). You can change your text size but clicking on the T box.  Play around here to familiarize yourself with the icons.

ADDING PICTURES

To add pictures you will need to click on the icon of the picture (to the right of the LINK icon). To upload pictures you click where it says, "Choose Files".  Upload all the pictures you will want to use for your post (if you find you need another later, don't worry... you can upload more).  When you are ready to add a picture select the picture (which will highlight it in blue) and click "Add Selected".
When you add your picture it will look like above (I have taken pictures of my work on this blog to help you which is what you see above).  
If you click on your picture, it will turn blue and you will see choices below your picture.  You may choose to add a caption, change the size of your picture and choose where to position it on your page. On my blogs I often will choose a medium picture (which is the default size you see on this page), but I will move it to the left so that I can type to the right of my pictures.  This is all personal preference and there is no right or wrong way of doing it.

ADDING LINKS
Creating links is very easy in blogger, this is how you do it.  
While you are typing there may be a WORD that you want to use as a link. (I am going to use the word, "WORD".  Start by highlighting the WORD that will be your link.

Once it is highlighted (as seen above), click on the underlined word "Link" above next to your picture icon.  You will see this:
Then all you need to do is type the address you would like linked in the box provided.  I have created a link from the word "WORD" above to a website I like at www.wordle.net.  When you are done entering your link just click "OK".

Play with this page! You can change the color, add bullets, and of course SPELL CHECK! You may also add movies using the icon of the "Director's cut clipboard" above.  Be warned that the videos you post using this method can not be very long which his why I use another way which I will show you in my next post.

GOOD LUCK!